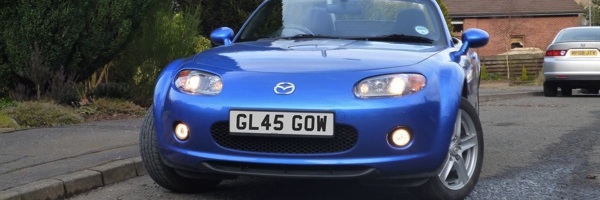
Yet another How To guide for your MX-5. Just showing that doing stuff yourself is not that hard. First posted back in September 2009, this article takes you through the process of fitting front fog lamps to a Mk3 MX-5. Although I use the standard Mazda lamps, there is nothing stopping you from using other brand lamps with a suitable fitting. Let’s get to work
Hi All,
A little later than normal but here is this week’s How To. This time It’s how to fit a set of Mazda foglamps. Again, ebay provided me with a nice pair including the mounting bezels and indicator stalk. If you pick some up 2nd hand look to see if the kit comes with all of the above. It’s common for them to be supplied without the bezels although they can be picked up relatively cheaply from mx5parts.
I had two reasons for adding foglamps. Firstly, I think the blanking plates that fill the gaps where the foglamps should go are rather dull. The lamps give the front a bit of a lift and, I think, make the car look more balanced. The second reason is that I have been caught out in heavy rain and snow before where fogs have been (or would have been) very useful. I also find that they pick out the edge of the road better when the lights of oncoming traffic are slightly dazzling.

Firstly, you do not have to remove the front bumper to fit the lamps. You do not even need to remove the front wheels. What you will have to do is remove some of the fasteners that hold the wheel arch liner to the bumper. To get good access to them turn the wheel full lock in the direction away from the arch you are working on. The fasteners require a slight turn with a suitable screwdriver, the inner peg will become loose, then you simply pull on it to remove the fastener from the car. It’s up to you how many you want to remove. The more you do, the better access you’ll get to the lamps.

There is also a bolt underneath the car, in the corner formed by the front lip and splitter. Use an 8mm socket to remove this. For many this will allow the wheel liners to be moved away freely. For me, I found that the liner was stapled to the underside of the bumper so removing this bolt helped very little.

What you need to do now is pull back the liner firmly and stick your arm in the gap. You may be working blind but the next step is quite simple. You need to pop out the blanks. Be aware that the instructions do show a single screw holding the blank in place. So far I haven’t come across anyone who has actually found this screw present. Check first, and remove it if it’s there. As you can see from the photo below, the blanks are held by 3 tabs. All you need to do is push each lug in turn radially outward and pull back on the blank. It’ll take a bid of jiggling, and you need to free all three tabs before pulling the blank back any significant distance, but it’s not a tough job.
Behind the blank you’ll see that Mazda have been good enough to give us all the wiring we need to fit the new lamps. Thank goodness the gram saving strategy didn’t apply here! You need to carefully cut the blue tape to allow you to unravel the cable.

The foglamps can be mounted by pushing them into place and the tabs will click into place. Attaching the plug to the socket is just as simple. It’s all surprisingly simple.

The lamps are then secured in place by two screws. My kit didn’t have these screws provided so I got a bag of 5 x 20mm self tapping screws with pan heads and zinc coating. These are ideal. One screw goes in the top. One in the bottom. It might seem a little awkward to do via the gap in the wheel arch liner but, hey, I managed to do it and take a photo at the same time so it can’t be that hard!

Refitting the liner is just the opposite of removing it. Push the fasteners in by their outer ring, push in the inner pegs, quarter turn with a screwdriver to lock them.
Now onto the interior work – fitting the new light stalk. If you have used your own fog lamps rather than the Mazda ones you should be able to pick up a stalk new or used quite easily. The MX-5 and RX-8 share the same stalk. Some other Mazdas may have the same stalk also but you’ll need to choose carefully. You will need to remove the steeling column cowl. This was perfect for me because it’s been making a squeeking noise so I could fix that too! Use scraper covered in insulating tape (or similar flat blade) to pry apart the cover. The top part pops up.

From the photo below you can see where the clips are. Hopefully this will give you a better idea as to where to apply a little gentle force. The bottom part is held with three screws which are got at from underneath. A Philips screwdriver should make light work of them.

You don’t need to fully remove the lower part of the cover. It will hang quite happily, suspended by the ignition light cable. You will need to remove the indicator stalk. It is held by two small screws. Remove both.

You will also need to remove the wiring plug. It’s the type you press the tab and pull downward. It should come away without a fight (unlike many of them).

Just before you remove the stalk it’s worth watching that it doesn’t scrape the piano black strip on the way out. You can tape it to protect it or, if you are very clever, there is a way to remove the stalk without coming close to the strip. It’s hard to describe but it is quite possible.

Fitting the new stalk is simply the reverse of the removal of the old one. I put some grease around the places where the steering column cover parts meet. That killed the squeek so I’m doubly happy.
Finally, test your new foglamps. It’s a simple job so there shouldn’t be any problems. One thing you may have to consider is checking the alignment of the lamps. This can only be done when it’s dark (obviously). I pointed the car towards a wall and turned on the fogs. If you are about 3m away the centre of the beams should be 60mm away from the ‘brightness borderline’. Yeah, I hardly understood it either but the beams seemed to be suitably low and focused so I left them as they are. What you don’t want is for the beams to be pointing slightly upward.
Adjustment is made by loosening the adjustment bolt on the bottom of the lamp unit and sliding it forward and back in its slot. I’ll bring you more on that if I find I have to adjust the lamps when I recheck them.

So, there you go. Another job done. I think I’m beginning to run out of mods to make.
Dave
Hi,
Is this the pre June 2009 Mark? I’ve just picked up a new one which must then be the Mk4, I think?
If so, do the same instructions apply?
Thanks,
David
The electrics are the same for the post-2009, Mk3.5 model as they are on the pre-2009, Mk3. So, the connection and the new stalk is the same. Since the front bumper on the Mk3.5 differs from the Mk3 the mounting bezels are different. However, as far as I know, the actual lamps are the same. Therefore, the only difference in the fitting will be in handling the Mk3.5 bezels and blanks. If I were to guess, I’d say that they will likely be very similar to those of the Mk3 and so will be just as easy to work with.
Hi Dave,
A quick question, I read the Mazda fitting instructions on the ILM web site, is there a need and did you disconnect the battery before tinkering with the electrics?
Considering getting these for my 5, as you say the blanking plates look awful, but dont have the radio code if the juice gets turned off.
Martin,
It is good practice to disconnect the battery. The biggest fear is that you’ll accidentally cause a short which will damage something expensive such as the ECU or the airbags. But, to be honest, I didn’t bother. It was a calculated risk as the fog lamp circuit is properly fused and I wasn’t touching anything else electrical. However, you asked about the radio. Unless a code has been set on the radio, it won’t have one. It’s a lot like mobile phones. You can set a pin number to lock access to them but very few people actually activate that facility. I took a chance with mine when I was fitting an iPod kit and happily discovered that it didn’t have a code.
Good Luck,
Dave
Hi Dave. Recently bought leather door panels for my 2007 1.8. Your guide came in very handy!!!
Next on the list is to fit fog lamps which I see you have already done. All I need to do now is source a set!
Many thanks fo rthe top tips, the pictures help a great deal.
Regards Fraser
Glad to be of help. I notice that a pair of used fog lamps with housings have been listed on eBay today for £50. Could be just what you are looking for.
Hi Dave. Thanks, I bought them. I managed to get a stalk from another breaker. Now I have to fit door panels, fog lights, and hoop covers once I take the car out of storage in May. Thanks again for all the tips, the pictures are a great help. Fraser (Denny / Falkirk)
Fitted these today. Your instructions and pics meant I did the job in 40mins. If I, as a pensioner with no diy skills, can do it anyone can with this easy step by step guide. Many thanks GlasgowDave for taking the time to publish this, very much appreciated.
Hi, Please do you know if a pair of RX8 54 plate front fog lights will fit on to a 57 plate MX5 icon, we know we will need to get the bezles as well???
Hi, Dave. Thanks for the help on how to fit spotlights to my MX5 Mk3. Purchased the kit from MX5 Parts, and although it came with instructions (Some of which were in Japanese), I found your instructions and photographs invaluable. Did the whole installation in less than an hour. Thanks again fro a great web site, Roger B
Hi Dave, excellent instructions, fitted mine in less than 40 minutes, what I did find helpful when removing stalk was to drop steering column to lowest setting, gave much more room.
Thanks Dave, top man.
Hi Dave
Just fitted my front fog lights to my MX5 3.5model following your instructions, execellent help and only took 2.5 hours by some one who does not work on cars.
Many thanks for the advise above
Regards Colin
Hi Dave
Your thread gave me the confidence to tackle this myself.
Although I took my time if I had to do it again I reckon 30 mins would do it.
Couple of updates to your method that I found useful…
Turn the wheel out rather than in.
The staples are a red herring.
Remove all the clips and bolts for the lower section. On the third arrow up on the inner arch picture go along the horizontal line of clips etc and follow round and down.
The underside of bumper has 4 bolts and a couple of clips.
Once undone the lower inner arch panel drops out.
The stalk bit…
Remember the column is adjustable so lower it.
The upper cowling popped off easily by carefully putting a small screwdriver above the stalk ‘square’ and lever gently.
The rest is as you did I think
Thanks … 🙂
Martin
Gloucester
Oh and … Take the black connector off the stalk before unscrewing
Hi Dave?
Truly pleased I found your ‘how to do’ forum, it only took me 1hr to fit the fogs and stalk, and me a complete novice at this sort of thing..
many thanks
I would just like to thank you so much for making fitting fog lamps to my mx5 so so easy I’m realy chuffed.
Thanks again
John
Great instructions Dave, fitted a set to my partners car in less than an hour. While acquiring the parts I found that apart from the bezels everything else is the same as fitted to the RX8 of similar years, and I got a set of steering wheel stalks from an RX8 that added variable intermittent wipe while I was at it! Thanks again.
Hello Dave,
Just finished fitting fogs to my roadster. Your instructions where 1st class, could not have done this work without them. You saved me a lot of money Dave as I was going to get my garage to fit them, that was before I found you on Google. Thank you very much for your information. All the very best to you and yours. Eddie.
Fantastic write up it help me a load.
What spec bolt did you use for the adjustment bolt?
Dave. Thanks to your excellent notes I had the confidence to fit some fog lights to my mk3 today. I am no mechanic and I followed your guide and 2 hrs later I have a nice set of fog lights fitted. Joe
That’s great to hear. We’ve been having a bit of fog recently so you might get to use them. Otherwise they still make the car look more finished.
Hello Dave done the lights as shown spot on instructions .cheers 👍 “I like your number plate smart 👌
Hi Dave, thanks for this advise just bought set of fogs and stalk off eBay £90, as Mazda wanted £350 to supply and fit, was going to get an auto electrician to fit but when I saw your blog decided to have a go what a success, fitted the lot to my mk 3 today in under an hour 😎 cheers and keep up the good work. Improved the front styling as you said. Brian & Chelle
Hi
Want to fit spot lights to a MX5 2008
Just purchased the steering boss from a Masda RX8 that has both control stalks.
Will the wiper control fit the MX5 and give variable speed control on the wipers?
thanks for advice
Brill instructions Fave. Many thanks.
Best thing we did was to buy a set of new clips for the wheel arch trims – saved a lot of angst as most of the 9+year old ones wouldn’t co-operate and come out easily ;-))
Yes. I fitted the RX-8 wiper stalk to my MX-5 so I could get variable speed intermittent wiper settings.
Glasgow Dave:
Greetings from a fellow Scot living south of the Border!
I have a 2008 Mk3 NC which has no fog lights. I’ve bought the lights, stalk and bezel kits from MX5Parts and I’m ready to fit them.
Unfortunately, your pix are no longer available. Is it possible you could zip them up and send them to me?
I’d really appreciate it!
Cheers
Ian