Removing the door cards on your car is always a hassle. I did it to fit some nice speaker rings so I documented the process to help others. It’s another forum post saved from oblivion.
Hi All,
I fitted the silver speaker bezels this weekend so I thought I’d do a post on how to remove the door cards and fit these rings.
I’ve always thought the standard look of the doors on the MX-5 was a bit bland. The Sport and some special edition models have the satin silver speaker bezels and door handle caps to brighten things up. Time for me to add the same bits to my 2.0 Option Pack.
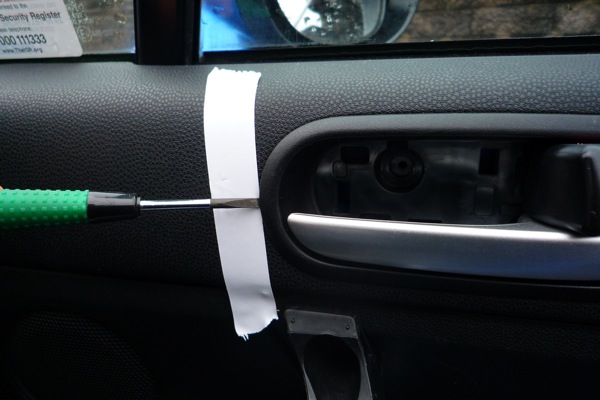
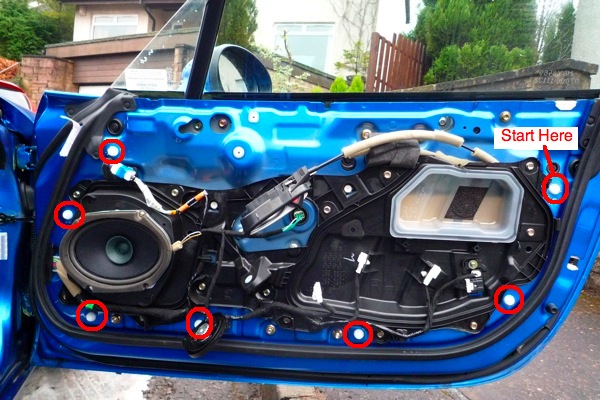
1) First thing is to remove the three screws that secure the door card. The first one is located under the plate under the door pull. It’s pretty easy to get a screwdriver under the plate if you attack it from the hinge side. Gently pry it and pull it towards you and it’ll pop off.
2) You can see the lugs that hold the plate in place here. That should help guide you as to where to apply the force. You can see the screw that you need to remove there too.
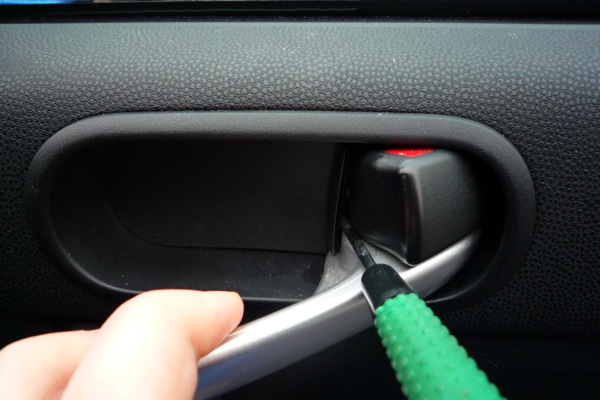
3) Next step is to remove the door handle caps. You can see that I protected the door handle with a little electrical tape. I then slid the screwdriver under the cap and wiggled it about a bit till it popped off.
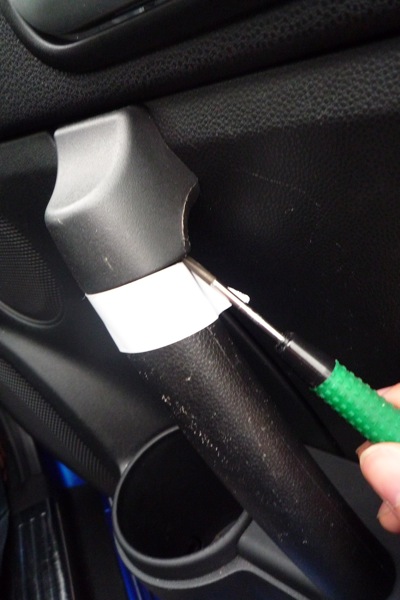
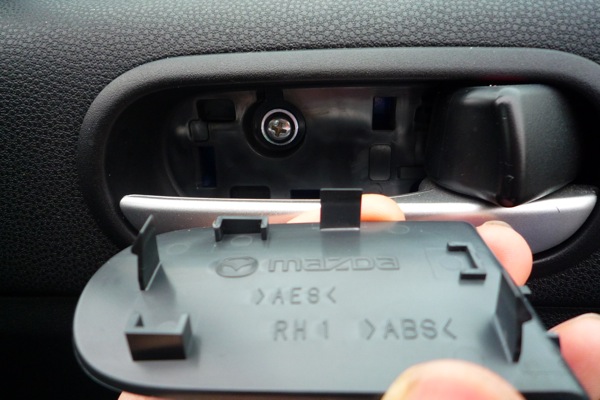
4) You can see how the cap holds onto the handle in this shot. Perhaps it’d be easier to lever it off by attacking it with the screwdriver from the side. At least if you come at it from below, as I did, any minor damage you may create is less noticeable. Go ahead and remove the screw located under the cap.
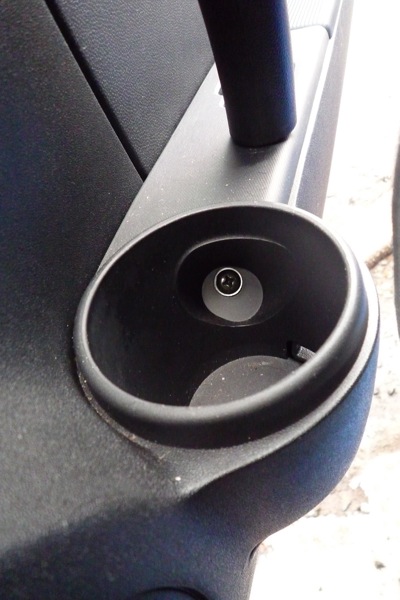
5) The third screw is in plain view in the cupholder. (which cupholder? there are so many…). Just be careful to note which screw came from where. They are all different and not interchangeable. Black – cupholder, Silver – door pull, Bronze – door handle cap.
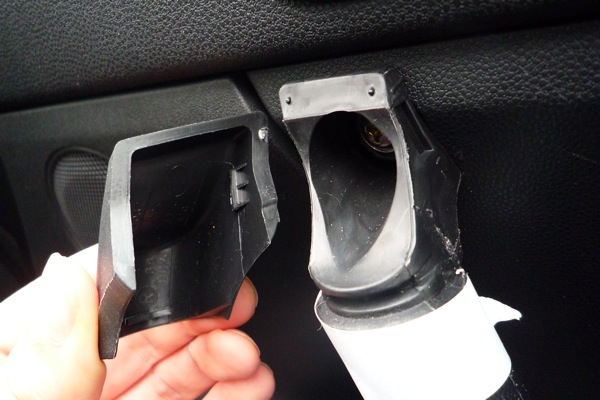
6) The housing for the door pull needs to be popped out too. Protect with a bit of tape and lever it out. Attack it from the front of the car.
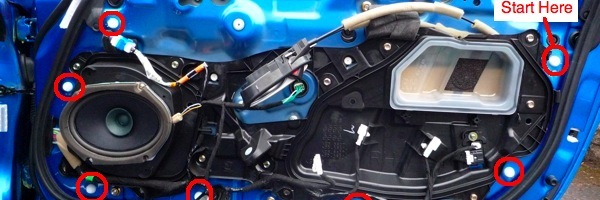
7) The next bit it a little tricky. You need to pull the door card off. It has 8 trim clips holding it in place. My advice is to start at the one at the right and work down and round the door in order. I used a large screwdriver with the tip covered in insulation tape to lever the panel off. It’s a tough job. Some have said that using a sharp but firm tug gets frees each clip in turn. Personally I took it slowly and tried to ease them out. You will break some. It’s not the end of the world though. More about that below.
8) The card is hooked onto the door at the top, so once you have freed it from the clips, pull the bottom towards you a bit and slide the whole thing up. You’re not done yet though. You need to manouver the door pull through the card. You need to unplug the mirror controls (driver’s side only). And you need to unscrew the tweater from the card. Don’t try to unplug the tweater. It’s so much easier to just unscrew it. Trust me 🙂
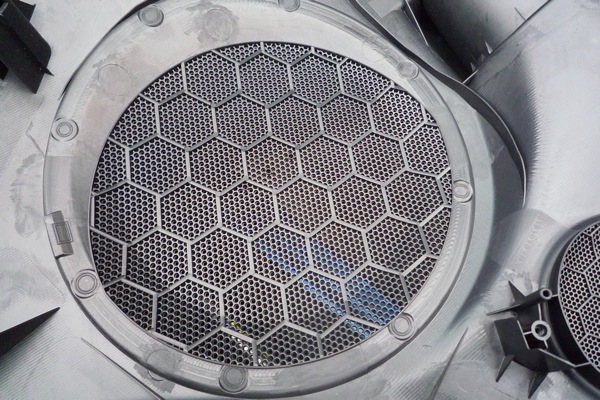
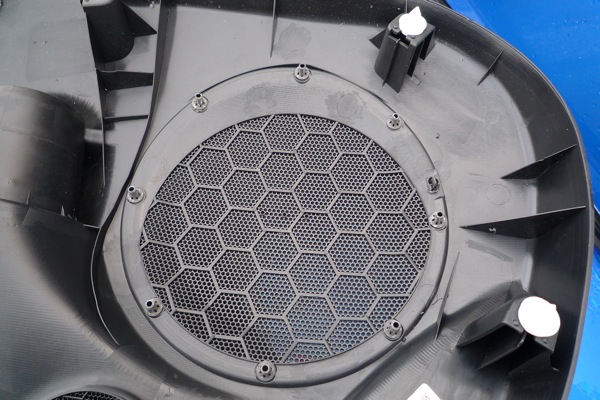
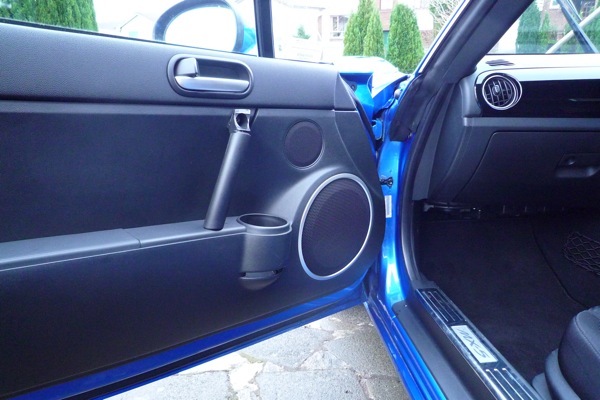
9) So now you have the door card free you can lay it down on a blanket or something so as not to scratch it. As you can see, the door card is already marked for drilling out the holes to accommodate the speaker bezel.
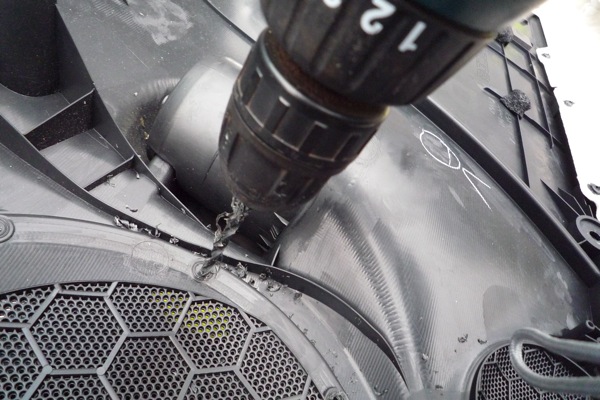
10) Start off the holes using the tip of a sharp knife or similar. Then use the drill. I suggest drilling the holes using a 4-5mm bit to begin with and then widening them out using a 6mm bit. This’ll give you a change to see where the holes lie on the other side of the card and then you can work to widen the hole in whichever direction suits.
11) You’ll need to do a fair bit of test fitting and hole adjustment to get the rings to sit down properly in the grooves. It’s a must that the bezels sit correctly otherwise they’ll look rubbish 🙂
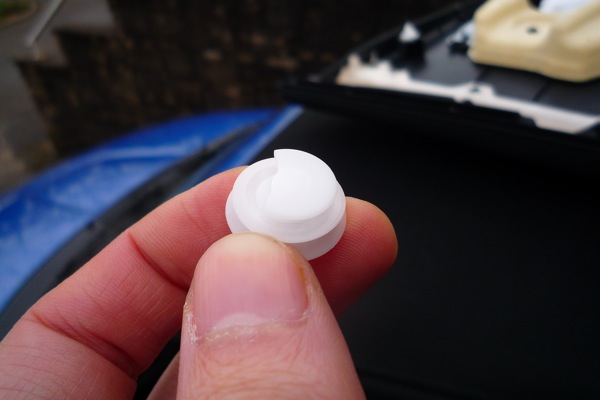
12) The bezels are secured using these grippy ring things ™. They are a little tricky to get on at first. You can then push them down using the tip of a screwdriver or I used the chuck of the drill. You can see the one below is sitting on top of the outer ring of the grille. The instructions suggest you cut a slot out of the ring to allow the fastener to sit flat. In practice this is not necessary.
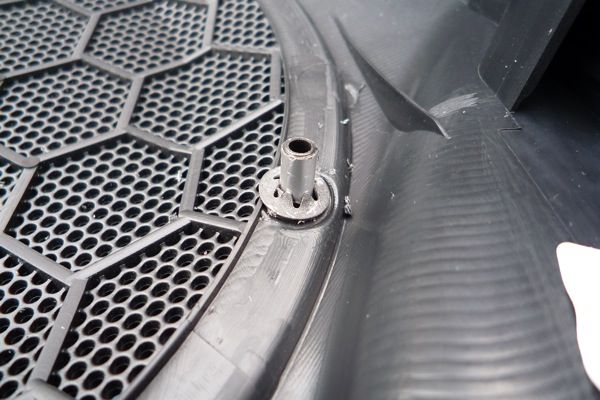
13) You can see how the back side looks once all the clippy ring doo-dahs are in place. You may also see the mess I made of drilling out a slot for the tab. Some people have just snapped the tab off. I can’t see that it does much good so it wouldn’t be a loss. I preferred to keep them though.
14) The worst part of this job is the trim panel clips. If you are a religious person you will blame God for the misery you have to endure. If you are not religious then you will find God and then proceed to blame him for this misery. 🙂 Seriously, this is supernaturally awful.
The problem is that the clips have about 1000 times more affinity for the door than they do for the panel. The result is that they stick in the door rather than remain in the door card. The problem with this is that you cannot refit the door card this way. You can see the damage I caused in trying to pry the first clip away along with the card.

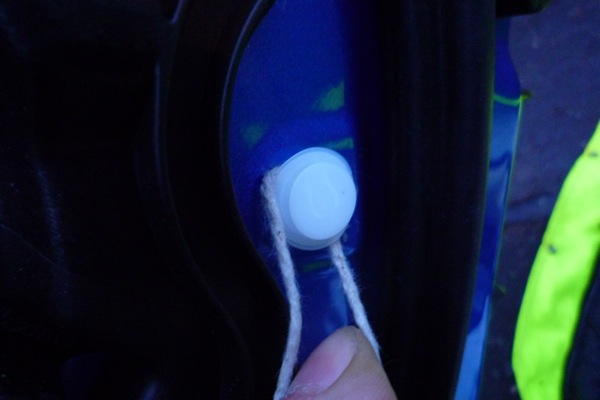
15) The trick I used is to wrap string around the clips several times and then pull the string to release the clip. This is not 100% successful. The string can break. Your fingers will hurt and the clip will remain in place. You can help things along by levering the clip at the same time with a flat blade screwdriver.
16) This is a removed clip. As you can see, it looks harmless. Don’t be fooled…
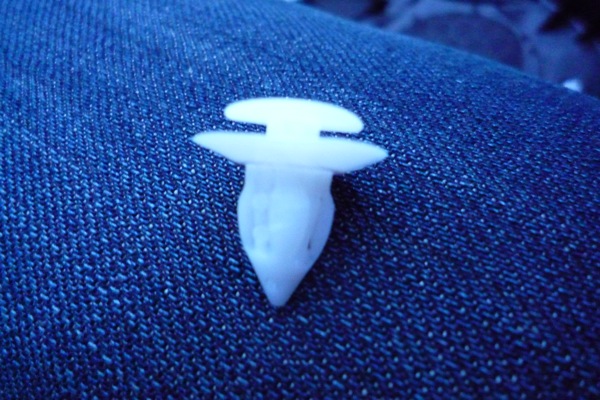
17) Often the clips will have broken at their tops when you removed the trim panel in the first place. As long as at least half of the top remains the clip is fine to be reused. I just wonder if Halfords universal trim panel clips could be used as replacements. They are an awful lot cheaper than the Mazda ones and they may actually be stronger. That said, I didn’t need to replace any.
18) The clips should be reseated in the door panel. And the panel refitted using the reverse of the operation detailed above. One big hint is to add a little grease to the ends of the clips. This will make them pop back into the door an awful lot easier. It may also help you if you ever want to remove the door card again.
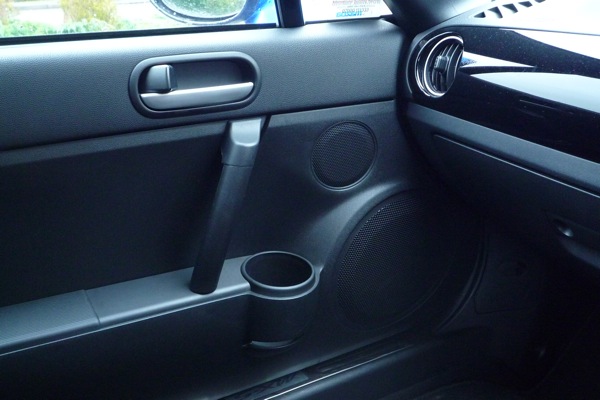
19) You can see the finished article below. It looks really smart and is, in my opinion, a major asset to the interior. All in all it’s a worthwhile upgrade even with the pain of the trim clips.
If you have any extra advice as to how to remove and refit the door card then please add it to this thread. If you think I’ve missed something then let me know and I’ll edit this post to add it.
From the missing door handle caps you can probably guess what my current project is. After that the speakers may be getting replaced. Hopefully I’ll be expert at removing the door card by that point!
Dave
Very good review on how to remove the door cards.
After reading i bought some plastic trim removal tools £8.00. Most of the plastic clips remained in the door,and I was ablle to remove the clips with ease using the trim removal tools. I fitted speaker rings cromed handle cover and brushed aluminium door plate to match the dash I had fitted.
Another very informative and entertaining article. You really have a gift for conveying information but you’re not from Glasgow. A real Scot would not pay the outrageous prices for a pair of chrome rings. Disgusting, I want some for my car.
Bootz, I bought my speaker bezels from eBay. Instead of paying the usual £37.69 plus postage, I paid just £22.03.
Dave,
thanks, a great help as I”m going to fit the speaker bezels. Looking to fit a rear air dam and wondering if you have a step by step guide to removing the rear bumper on a 2006 mx5 nc
Cheers,
Dean.
Very informative. The passenger speaker in mine is making a
buzzing noise from time to time. Somehow seems to go away if I park
downhill, so will open it up to see what the deal with that speaker
is. Don’t think its blown as sometimes it works sometimes it
doesnt. Moisture maybe… we shall see.. I’ll have to buy some
replacement clips before doing this mind, I’ve read in quite a few
articles that clips are likely to break.
Thanks in advance Dave. I’m gonna have a go at this today for both speaker upgrades and bezels. I’ll let you know how I get on
Just use a forked type tool to remove those trim clips that are stuck in the door.try and get under the lower flange as gripping the top one will break the mounting point on the clip.
A great help. I got the Draper Trim Removal Tool which helped to get them out of the door but not get the panel off. Need some replacements but looing for a cheaper alternative to the Mazda ones. When you do the speakers can you tell me if you worked out which wire was plus and which minus? Trial and error was no help as they sounded the same to me. A worthwhile upgrade though. Simon
hi,dave,where did you get the bezels from thanks
I got mine on eBay. I was looking to see how much I paid but I can’t find the email. It’s s standard Mazda upgrade so it is also something you can get from your dealer.
Useful photos as I fitted upgraded speakers to my MX5 at the weekend.
Used a small builders trowel wrapped in tape to locate the plastic clips before levering out with 1 inch wood chisel, again wrapped in tape.
To remove plastic retainers from the door used string trick but used nylon cord for hanging pictures. Tie short length into a loop, wrap around retainer then pass handle of screwdriver through remaining loop and twist until tight. Then pull using handle of screwdriver. Much easier on the hands!
I’m thinking of fitting the JVC door speakers offered by MX-5 Parts. I think that this time I’ll get a trim removal tool and some spare trim clips. I want to make sure that I don’t have a rattling door card when the music is up =)
Thanks so much for this guide, it’s really helpful. By the way the Halfords universal clips work fine on a MK3 and are dirt cheap.
Dave,
Good article. Was about to tackle mine when I noticed the door pulls do not have top caps! My 3.5 handles appear to be all one piece so have you any idea how the top handle screws, if there are any, release?
Ah-hah, good question. I’ve never tried this on a 3.5. I suggest that your best bet is to ask the nice folks on http://mx5driver.com/
Good luck
Thanks for the help Dave. Very good article. Made the job a breeze
Looking for a fiver and hadn’t realised how things like door handles and bezels would differ between SE and Sport etc – so your site has been really useful in identifying some areas I might have to address if I buy an SE. Thanks so much
Page is still doing good, perfect guide to change a door speaker, cheers 🙂