Hi All,
This is a forum entry first posted in on Sep 11 2009 on the http://www.mx5.com forum. As is the nature of forum posts, it began to disappear into the depths of the forum. The search feature had been reasonable so posts could be found if need be. However, a poor ‘upgrade’ of the forum software left old postings almost unretrievable. So, here it is again in the hope it’ll save someone a few quid.
It’s taken me a while to get this How To guide written but there is a good reason, which will become clear towards the end.
So hopefully this will give you an idea of how to cheaply do repairs to your alloy wheels without having to resort to Chips Away, Halfords or even a full refurb. Using this method you can repair your first scuff for under half the cost. Subsequent repairs are then effectively free! 🙂

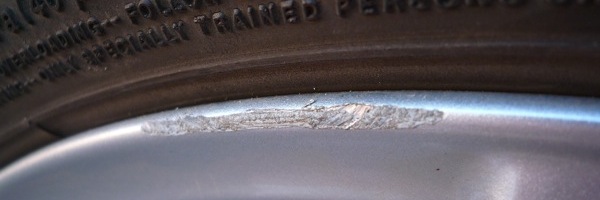
I started along this adventure because I managed to ‘personalise’ one of my rear wheels when out on a Scottish Fivers run. I didn’t realise I’d done it at the time but upon seeing the damage later I have a faint recollection of tapping a kerb with the tyre. Looks like the Advans don’t give a lot of protection.
It was only a minor scrape so wasn’t at all worth getting it professionally fixed. Instead I researched online to find out how to do something about it myself. The biggest problem is finding a matching paint. A trip to Halfords will reveal a massive array of silvers.

I have been reliably informed that ‘Ford – Stardust Silver’ is a reasonably good match. I had a can of ‘Audi – Platinum’ kicking about from a previous job so I decided to give that a go instead.

You’ll need a few other things also: Knifing putty, 240 and 400 grit sandpaper, masking tape, filler spray, clear lacquer and thinners. I’d also recommend adding 800 (or higher) grit sandpaper to the shopping list so make life easier later. It costs almost nothing so why not?

First step is to wash the wheel. I recommend using washing up liquid. That’ll shift any wax protection you have on the wheel. If you don’t have a good, clean base to begin with then it’s really not worth starting at all.

Now it’s time to get (slightly) destructive. You need to use the 250 grit paper to remove the worst of the rough surface and the barbs created by the kerb. You’re not looking for completely smooth but nothing should be sticking out proud of the natural curve of the wheel. You can move to the 400 paper if you want to be more careful or to finish off. The big hint is to thoroughly wet the sandpaper when using it. This softens it and make it less aggressive and less prone to getting clogged up. Rinse it regularly.

You can see how my wheel looked after the sanding. Pretty good. I was even tempted to smooth it off with a higher grit sandpaper, lacquer it and be finished. However, the colour match wouldn’t have been great. What you need to do next is use the knifing putty

The putty can be a little tricky to work with for small patches. Where the scuff is bigger you can and will need to slap a little more of this stuff on. It starts off quite soft but hardens up pretty quickly. Place it the best you can, wait a little and then mold it slightly with your fingers. If you’ve got your timing right you won’t end up with putty fingers and in a right old mess. 🙂 It’s also worth bearing in mind that you are much better putting on a little more than you need. You can see how messy the filler looks on my wheel before I sanded it.
The next step is to wait for the putty to set. Read the packaging for guidelines and don’t get all impatient! 🙂 You’ll then want to sand it down to something nice and smooth. Be gentle with the sandpaper, use lots of water and start with the 250 before moving onto the 400.

Use your fingertips to check the level of the fill. You don’t want any lumps or steps from the line of the wheel. I find that closing my eyes whilst rubbing my fingers over the repair helps. Maybe that’s just weird. See what works for you. And don’t worry if it’s a little low (not a lot). You will be adding a little more depth with the next step.
The filler spray I use is a combined filler and primer. It builds up the level a little, smooths out any minor imperfections and provides a great layer for the paint to stick to. The only two bad things about the one I have is that it’s yellow and it needs to be left overnight before sanding.

Spraying can be messy so mask off the wheel well. You don’t want to have yellow tyres! get the masking tape in well behind the wheel where it joins the tyre.

Another tip I picked up is to use some kitchen roll and thinners to remove any overspray immediately after spraying. Much tidier than trying to remove it after the event.

You can see that after 3 coats of filler I have covered a larger area than the original scuff or fill. That’s okay as I can use the sandpaper to get a nice smooth finish and get rid of any excess filler. But, in the end, if it’s only a very thin coat, and it’s smooth, it’ll be unnoticeable when sprayed with top coat.

At this stage it’s worth using the 800 grit sandpaper to finish off.
Clean off the area, mask things up again and let’s get started with the top coat. The biggest thing to avoid here is the temptation to put on too much paint in one go. Give a few sprays onto some newspaper (rather than a bus shelter) to get a feel for the can. And make sure you really do shake the can for a minute before using it. It’s important. 🙂

I recommend at least 3 coats of top coat paint. I think I needed 2 just to hide the primer. You only need to wait 15 minutes between coats so doing 4 light coats instead of 3 heavy-handed ones is not going to fill up your day.
You can see what my wheel looked like after all that:

Pretty good for a first attempt, don’t you think? The problem is that the brake dust and other nasties will eat away at the paint so what you need to do it protect it with the lacquer. Metallic paints don’t get their proper finish until you apply a lacquer coat anyway.
Big thing to be aware of with the lacquer – it’s much thinner than the paint. You only need a light mist of it for 1 coat. As with the other spraying steps, you’ll want at least 3 coats. Also, it’s recommended to lightly sand the area to be lacquered first. I really would encourage you to use 800 or 1200 grit sandpaper for this. I was very gently with 400 and I wasn’t completely happy. However, after the first coat of lacquer it looked superb (if I do say so myself 🙂 ).
It looked great after lacquer coat 2 as well.
But then, on coat 3 the nextdoor neighbour distracted my with some cheeky comments and I sprayed a little too much. Then the lacquer began to run! 🙁 .
There was nothing I could do. I tried using the kitchen roll and thinners technique but I ended up having to take off the lacquer, and a lot of the top coat too. Grrr!
So I started again from the top coat stage and built it back up. Here is the result.

You can see the change in finish where the repair has been done. I’m not sure why. It looked great the first time round. Perhaps it’s just that the Audi Platinum has a finer metallic fleck than the original paint. I dunno. Any ideas?
I was quite annoyed at the finish and have considered going back to the beginning and starting again but I’m not sure what I’d do differently. That said, here’s what the wheel looks like when you are not staring at the repair.

Not that bad really. I can wash the car and not notice it when I’m cleaning that wheel. So perhaps I can live with it after all 🙂 Also, I spent some time taking the other picture, getting the light just right to highlight the flaw. In the other photos it was much less noticeable.
In conclusion, repairing your own scuffs isn’t too tricky. It’s much cheaper than a professional job which means you can do it whenever you’ve daft enough to kerb a wheel 🙂 . And, perhaps the biggest advantage, it makes you feel much better after the pain of dinging your pride and joy with a bit of careless driving.
Happy wheel repairing,
Dave
Dave, brilliant article, thanks very much – I’m just about to try this myself after curbing the wheels the other day, i’ll stop kicking myself about it once the last coat of paints on!
just saved me a load of cash, didnt quite turn out as nice as yours, but definately disguised. cheers
Good to hear other people are having success with this too.
thanks david, this is a very useful article, may i ask was it difficult to find the colour to match the wheel paint? did you try several before choosing the correct one ? thanks.
I had some silver paint from on other job and it was a reasonable match. However, the Ford colour which I mention in the article was recommended to me by a paint expert. I wouldn’t say that it’s a perfect match but you have to look close to see a difference.
great article..after buying my car I asked about cost of wheel refurb…I´m in Spain, 50€+ each wheel…I used a silver wheel spray available in local shop…good match!!
Nopt perfect but only I notice it!!
David…this is a brilliantly written article. Big thanks to you. Fancy a homer? 🙂
you could lightly wet sand the whole wheel before the the final silver spray. Then spray the whole wheel. could make a better finish. thanks for the info tho!
This is true and should give a more even finish. However, wheels are a tricky shape to spray evenly with a spray can. So, I think it’s a bit of a gamble unless you are confident in your skills.
You’re welcome. And I think that doing a homer for you would just rob you of the satisfaction of doing it yourself 😉
Dave I am a novice at spraying! I followed your advice but Iam not sure I did the right thing by putting masking tape not only on the tyre but on the wheel immediately below the the repaired area. After spraying three light finishing coats and removing the tape I have a ridge where the repaired area meets the the rest of the wheel. Should I start again and not use tape on the alloy wheel and spray both the repair and surrounding area of the repair?
With regards to my previous post the paint you suggested does not match my wheels which are on a 2008 Niseko. Any ideas of colour ? Mazda have been next to useless their technical dept. could not advise me and suggested I go to the dealer who sold the car. Needless to say the dealer and their body shop could not help with the colour other than book it in with them for repair!
Picked uo a brand new car Tuesday night, the wife tells me the front passengers wheel has a 15cm scuff, Thurday lunch-time….Looks like I’ll be giving this a try!
That’s bad luck. I assume that the scuff happened after you took delivery of the car? One thing to keep in mind is that Mazda wheels tend to corrode within the warranty period and can be replaced for free. I believe a few other brands have the same issue. So, as long as the wheel doesn’t look badly skuffed if and when you make a warranty claim you could end up with a brand new wheel.
So that’s how it’s done! Bless you Dave!
You make it look so easy! Very tempted to give it a go as I’m furious with myself for scuffing the alloys. Unless you fancy doing it for me? I’ll gladly pay!!
It’s worth giving it a go. Whilst the match may not end up perfect, it is often not noticeable because the wheel is down low. I’m going to have to get mine professionally done soon as all the factory applied paint is peeling off. My repairs are still holding strong though!
Brilliant article ,just damaged a spoke on my 2008 Ford Mondeo,scraped some metal off will definitely be giving this a go when weather is better,hopefully the Ford Stardust silver will be a good match on a Ford alloy,what do you think?
Sparkle Silver is the most common colour for Fords. Although STs used Brilliant Silver and I did hear that they were going to adopt that colour for all the range. It’d be worth looking on the Ford or Mondeo forums to check.
Best of luck!
Perfect for a VGood finish, it’s amazing what you can find on the Internet these days. I had lived with unsightly scuffs for a while on my Mini Cooper S before I stumbled upon this article, so I bought my items at Halfords for £33 and used a bit of my time. Not bad considering what most companies charge for this type of work.
The results on my first tyre weren’t so good but the others turned out very nicely indeed.
Many thanks Dave!
Great article, I own an MG ZS and I got it for cheap but all 4 wheels are curbed pretty much all the way around and I can also see bubbling. Will this process work if I plan to completely re-spray the wheels in white?
If the wheels are bubbling then the underlying corrosion needs to be tackled. You can either try this yourself by
A: sanding back the paint and oxidised metal to a bright finish and then applying an etch primer and then final paint or
B: Getting the wheels professionally refurbished.
I’m in the same situation as you now. My wheels are bubbling badly and need professional work.
Another side effect that you can have is that the tyre will fail to seal properly against the wheel as the wheel corrodes. This will cause air to leak out. I had this problem with my Rover 200 and I suspect it’s happening to the Mazda too.
Brilliant article. Many thanks. I’m just about to completely restore my 4 alloys as they have started to flake away and look a mess. I’m basically going to follow your tips but on the whole wheels. Hopefully 3 days will be enough time to do all 4. Many thanks again. 🙂
hi david. if i were you i wouldnt be too hard on yourself re your repair job on your alloy wheel i think its excellent with regards to smoothing out the putty try an excellent product fron SOLVALL its used by loads of guys to smooth out silicone you put on between tiles and the washand basin it stops the silicone being dragged and gives a mirror like smooth finish the product is called SOLVALL CLEANER
Great post Dave, I appreciate the time it takes to make posts like this.
I’ve just bought some 15″ Fox Race Alloys for my Eunos Roadster Mk1 and they are all scuffed and there is a gouge on one of them but I got them for a bargain price 🙂 the guy had, had a few beers and accepted my offer on ebay while shozzled lol!.
I’ll be blinging them up over Xmas.
Well mate, a good four and a half years after you wrote this excellent article,I,ve just found it
The cycle of kerb scuffing continues and I,m about to enter into the Frey!
I think fear is my worst enemy,but I shall use your great guide and hopefully come out the other end with a result as good as yours.
Cheers mate!
Hi Dave, first of all great article i am defiantly going to attempt this myself, any chance you could provide a full list of the products you used including brands etc?
Cheers
Thanks for a great article with very clear and easy to follow instructions…. However, I do have a question that I would like to ask you: Can Isopon P38 filler rather than the knifing putty be used?
Isopon P38 should be fine. Any solid metal filler should do the job. Those that are easier to work with and easier to sand are the best.
thanks for the article.
I don’t see any mention of primer on the metal; is the filler alone enough to prevent further corrosion?
Hi, thanks for the article. Is it possible to re-up the pictures? they are all 404 from imageshak now. thanks
Yes. The aluminium alloy of the wheel is less prone to rust than steel. So long as there is no loose material at the repair area the filler and overlying paint will seal the alloy. A bit of brushing with wire wool first could be beneficial if you want to be sure.
Thanks for the heads up. I’ll rehost them from glasgowdave.com when I get a chance. I’ll need to look out the originals.