With some nicer weather at the weekends recently I’ve been tempted to detail my car again. Detailing is just a fancy way of saying ‘clear really well’. =) Traditionally people have polished cars but the modern thinking is to avoid abrasives and use more effective, deep cleaning products followed by some high tech protection. I say ‘deep cleaning products’ but we start with Fairy Liquid. Enjoy.
Just to give a little background. When I purchased my car a year ago it was second hand and rather unwashed. Of course, I brought it home and gave it a wash with my trusty Autoglym shampoo and even a little polish in the problem areas using something in a green bottle. Overall I was disappointed with the results. For a car that was only 18 months old I expected it to really shine. It didn’t. Over time I decided that it must just have been in great condition under the muck and I’d got the best I could.
However, the more I learned about detailing the more I wondered what I could really get from the car. Traditionally my full treatment for a car would be a wash with Autoglym, T-Cut to remove tar, scratches and other imperfections, then a polish to shine and protect. Now I’m sure that’s got all you obsessive detailers weeping already. 🙂
I mainly took advice from Telfs here on the mx5.com forum and Rich at Polished Bliss. Rich in particular is a professional and knows Mazda paintwork. Thanks to steveti for putting me onto him. After a lot of research, here is what I used.

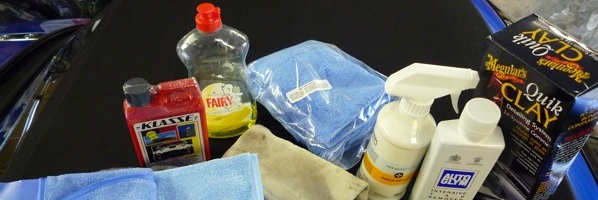
Fairy, AutoGlym Tar Remover, Meguiar’s Quik Clay, Klasse All In One, Werkstatt Acrylic Jett Trigger, a cotton cloth, two microfibre cloths and a microfibre buffing towel. The lambswool mit just seemed like a good idea at the time 🙂 . The process went something like this…

Step 1: Got the Karcher out to spray off all the muck. I generally keep a good distance from the car and/or spray at a shallow angle so as not to press the dirt against the car. The spray really makes a work of difference because you do not end up dragging dirt across the car with your sponge. You can actually feel the difference and over the space of a few years you can plainly see it too.

You can see that my hood is still beading nicely. I use the AutoGlym kit on it twice a year. My cleaning technique any other time is simply to blush the hood, spray it with the hose (not the Karcher) and then pat/rub dry. It’s pretty simple.

Step 2: Ah, how old school. Waching the car with Fairy Liquid. I can’t believe I used to do this as a matter of course. This was a reasonably strong mix to strip off any protectant still on the paintwork. I just used a soft car sponge but I’m thinking I can put the lambswool mit to good use for subsequent washes. The cloth on the handle is a Videda Flunky. I thought this was the mutt’s nuts when it came to drying cars. It’s certainly lightyears ahead of a chamois. However, the microfibre towel blows them both clean out of the soapy water.

Getting some foam on. Anyone tried Snow Foam?

You can really see the effect of the Fairy here. On the boot lid there is no beading at all. On the rear deck you can see the beading from the AutoGlym shampoo additive. Now, which would you rather have? 🙂

Step 3: I thought there was no better time to debadge. So I used the flossing technique with some waxed stuff. It took a bit of time but the badges came off. Then I simply used my nail and gently removed the adhesive. It was pretty easy to do. I do have a slight bit of fading of the paint and I’m not 100% convinced about the badgeless behind. So I might be looking for glue soon.

Step 4: I have to say, I think the single most important step in preparing the paintwork is detarring. I used the AutoGlym stuff. I was warned that it was pretty poor. As alternatives I’d hear about Tardis and, of course, petrol. However, I found the Autoglym great. The key seems to be the time rather than how hard you rub or how much you use. I squirted a little onto my cotton cloth and wiped repeatedly over eash section until it felt smooth. Larger tar spots I removed with my nail. But there were many many more tiny ones that I could feel, if not see. I rubbed over over everything from the sills to half way up the doors. Above that seemed in reasonably good order already.

Step 5: I used the Meguiar’s kit for claying. It comes with a white clay bar and Meguiar’s Quick Detailing Spray. Now, at this point I should say that if this was DetailingWorld.com I would be obliged to say ‘Meg’s QD’ and use the word ‘spritz’ when I wanted to say ‘spray’ or ‘skoosh’ 😀 Hey, but this is mx-5.com so I’m okay 🙂
So I skooshed a bit of the detailing spray on the boot lid and worked the clay over with a very light pressure. It went well to begin with then the above happened! Horrible dirty streaks. The clay was redepositing the dirt back on the car. Folding the clay to give a clean surface didn’t help. Neither did more spray. After a few postings here (thanks all) I found that using plain old tap water as the primary lubricant worked best. I just used a few skooshes of the spray for the tricky bits. You might not be so lucky if you live in an area with hard water.
Another top tip I discovered was for folding the clay. Once it’s been folded and you’ve worked the right shape, squirt a little detailing spray on a flat area of panel and press the clay against it to give a nice, flat surface. It will give you more surface area with which to pick up dirt.
As I said, the detarring stage was important because that removed most of the nasties from the paintwork and left the clay to do the lighter work. As such it got less dirty and made the job much easer.

Step 6: I was sure my car was covered in scratches. I use it everyday and park on street. However, after having done the above steps I found that there weren’t as many as I’d feared. For the ones I did have, I set to work on them using AutoGlym’s Ultra Deep Shine polish. I used a soft cloth to work the stuff in and a microfibre to buff off. You have to love the microfibres for their ability to eat up dust. You really do 🙂

Step 7: Ta-dah! Look at that boot! That’s just the paintwork and lacquer. Now it’s time to protect it. I took a lot of advice on this and I know many people use a paint cleaner next. However, I used Klasse All In One (AIO) which cleans as well as glazes so there was no need to use a seperate cleaner. You basically put a little of the stuff onto a microfibre cloth and work it into the paint. As with everthing else, it’s best to work in a backwards and forwards motion along the car rather than in circles. That helps prevent noticable scratches. The Klasse AIO can be buffed off straight away so that’s pretty easy to use. It does say to apply with a damp cloth. I used a dry one that became damp with Klasse AIO. I can’t see that it made any difference.
Step 8: Where as the Klasse does a great job of protecting the paint, this is the step that makes the car look great and add lots of nice protection also. Klasse is like your undercoat, Werkstatt is your gloss top coat. I know that many people love to wax their car but I was looking for something easy to use and that would last ages. The advice I got was that for lighter coloured cars an acrylic last step is better than a wax. Werkstatt Acrylic Jett Trigger is just a joy to use. You can fly round an MX-5 in no time. You just lightly spray a little on (don’t use lots), wipe it over the paint with a microfibre cloth, then buff it off immediately. I was careful with the first coat but on the second and third coats I found I could do the whole side in about a minute! It dries in about 20-30 minutes so you can get at least 3 layers on with no problem. I have heard that 5 layers is about reasonable. I’m sure the obsessed will go for more 😀

Step 9: Chuck your cloths in some Fairy overnight and get back to enjoying the results of all your (surprisingly not) hard work…


The results are excellent. It wasn’t until I started putting on the Werkstatt that I said, “Wow”. It really does add depth to the finish. The lighter end of the reflections are a little lighter but it’s the dark tones that really see the benefit. In overcast conditions my car always looked a sky blue colour. Now the real blues still shine through. It really has expanded the range of tones that the metalic finish gives off. I’m dead chuffed!
Dave

great job.
Good article thanks, but surprised you don’t use the two bucket method to prevent all those nasty dirt particles scratching your lovely paint work
You’ve got to draw the line somewhere. I remove most of the damaging dirt particles by the jet washing. I then reduce the risk of scratching the paint with any remaining particles by using a very soft and deep pile wash mitt. The abrasive particles are heavier than water so shaking the wash mitt in the soap bucket will cause them to fall to the bottom. Finally, I wash the dirtiest parts of my car last and ensure that there is always a little water left in the soap bucket when I’m done. That way any dirt in the water is not scooped up by the mitt. For the gain I’d get from a second bucket I don’t think it’s worth it
What do you use on the soft top? I’m embarrassed to report that my 3 year old 5 does have a faded top and soaks up water (no beading) like a sponge! Is there colour restore stuff that I could use to get that black look back?
Hi Dave, your site it’s very usufull for miata owners.
Your NC is beautifull but you have to lower it a bit….now it’s like a suv! 😀
Cheers from a proud NC limited owner
It sound like you need to use Renovo’s Soft Top Reviver on your MX5. This will restore the black colour. You should also use some sort of cleaner and proofer. Renovo also sell products for this. Although I’ve heard great things about them I’ve always used AutoGlym’s kit for fabric roofs. Results will be similar with either. Do check which order the products should be used in. I’d think; cleaner, reviver, proofer. Brushing the roof with a firm (but not too stiff) brush to begin with will remove a lot of dust. Or you can Hoover it. Also, avoid getting the proofer on the paintwork or glass. It won’t do any damage but it’s a pain to get off.
The proofing lasts around 6 months on my car. It stays out all year round so it might last longer on a garaged car. It certainly keeps the car much drier over the winter.
Good luck with the soft top care
Great, just great post. And Nice looking mazda…
Hi Dave.
Wow your car looks great.
I have just bought a 2003 MX5 in dark blue and am a novice as far as detailing goes. So a couple of questions if you don’t mind.
1. Why do you use fairy. Would any washing up liquid do? Or is there something in Fairy that makes it unique!
2. How important is the claying? Would WD40 on a soft cloth not remove all the pollution film, tree sap etc?
Many thanks,
Worgie.
Congratulation on the new car!
There is nothing special about Fairy. Any, reasonably strong detergent will do a great job of stripping off any products that have been applied to the car. That’s why using them is usually a bad thing. However, because you are wanting to get back to naked paint, this is the way to go.
WD40 or even petrol can be used to remove tar and other oil based contaminants. I use Autoglym’s tar remover and it is pretty good. Now, if you run your fingertips over the paintwork and it feels as smooth as glass, then you don’t need to clay. If you can feel any little lumps or even a papery feel then claying would help. I only do it once a year and I can get round the car in about 5-10 mins. For me, it improves the finish by about 10% but it all depends on how bad the car was to begin with.
Hope that helps. Now fingers crossed for some nice weather!
Dave
Dave.
Many thanks for your reply. That was really helpful. Will get started on it at the weekend.
Worgie
Dave,
Looks good – I always think that any car, no matter the age benefits from a good detail!
What did you decide about the de-badged look? How bad is the fading? I’m thinking about doing the same to my Winning Blue MX5…
Often it’s the older cars that benefit the most and show the most improvement.
I liked the debadging. It’s not a big change but it’s a cleaner look. I notice that the Mazda badge is now not fitted to new MX-5s. I noticed very little fading when I removed the badge. Now that the car is detailed it is not noticeable at all. Perhaps it was only glue residue. And you can, of course, rebadge if it looks bad =)
Dave
I have used your blog to fit my foglights to our new Mk3, that was top, thanks. I can’t agree with a few things here though. Fairy Liquid is loaded with salt that will corrode metals. I firt hose wet a car to soften dirt/debris. Then jet wash off the particles as stated. Then snow foam with a PH Neutral car snow foam. Jet wash off. Then use a micro fibre it to hand wash with a PH neutral shampoo – then flood with a hose to rinse and leave minimum water on the car. Soft towel dry. Blot soak tar with T Cut to minimise scrubbing motion – any paint contact is bad contact. Use a prep liquid to prepare paint (Zymol do a great product, smells like chocolate) before applying one of two routes – either a proper carburuna wax (not a spray wax) OR a crystal liquid made by the likes of G2 – this removes all minor paint faults as it re laquers the car. I did this on my 911 – it was professionally done but all in with detail cost nearly £900 – the end result was better than new though. With crystal I only have to carefully wash then use G2 detail spray, its done and really easy and quick On my MX5 I have used Zymol wax, bonded on with bare hand, it is the most bead producing method short of crystal. Spray wax is a cheap, low endurance finish for a quick job, nothing wrong with that but it is what it is. Autoglym products (I like their shampoos and all of their products for my motorbikes etc ) are slightly abrasive – anything that produces dust/powder is an abrasive. For glass (non G2 treated) I find sparing use of windowlene is better than autoglym fast glass – it does not produce dust. That’s just my input, cheers.
Fairly Liquid is harsh but it is on the car for minutes. Unlike deicing salt which is used on the roads. Unless you garage your car over the winter, it is going to get much more of a beating from that. So a little Fairy doesn’t worry me too much. I agree though, that there are better products. That sentiment also applies to most of the other products I use. But it is a matter of time and money. For me, I think I get the best bang for my bucks/time.